18 December 2008

USB Wifi Adapter with zd1211rw driver in Debian

Download the correct firmware from here: http://sourceforge.net/projects/zd1211/

Extract the archive and copy all files to /lib/firmware/zd1211

Open terminal as root and type:

# modprobe zd1211rw

Network-manager applet should recongnize the usb wifi adapter and scan the network.

Otherwise as root type:

# iwlist scan


( Source: http://www.linuxquestions.org/questions/showthread.php?p=3163685#post3163685 )

15 December 2008

Information for Intel graphics driver users

Quote

........

Configuration

The driver auto-detects all device information necessary to initialize the card. The only lines you should need in the "Device" section of your xorg.conf file are:

Section "Device"
Identifier "intel"
Driver "intel"
EndSection

......

Unquote


Source:

/usr/share/doc/xserver-xorg-video-intel/README.gz


(This post was edited on 16 Dec 2008 8:21 PM)
.

29 October 2008

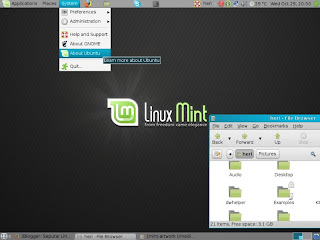
How I installed Linux Mint theme into Ubuntu Hardy

I am very impressed with the "Lightning" theme of Linux Mint 5 Elyssa on my laptop, so I installed it on my desktop which is currently running Ubuntu Hardy.

The steps:
  1. Go to Linux Mint Repository site and download these two files: gtk2-engines-aurora and gtk2-engines-candido

  2. Go to this website and download this file: mint-artwork_5.0-2_all.deb
    This file contains Mint Green icons and several Linux Mint themes, wallpapers and GDM themes.

  3. Install those three files in point 1 and 2:
    sudo dpkg -i gtk2-engines-aurora_1.4-1nano_i386.deb
    sudo dpkg -i gtk2-engines-candido_0.9.1-2nano_i386.deb
    sudo dpkg-i mint-artwork_5.0-2_all.deb

  4. Using USB flash disk, copy the Lightning directory from /usr/share/themes directory in the laptop to home directory in Ubuntu desktop.

    Change its permission:
    sudo chmod 755 -R Lightning/

    move it to ./themes directory in Ubuntu:
    mv Lightning/ .themes/

  5. Go to System > Preference > Appearance > Theme and select Lightning.
Enjoy the Lightning theme, it is really fast and lightning :)

27 October 2008

Linux Mint + Plain Gnome + Lightning = lite and fast


Linux Mint
has become very popular and naturally I tempted to try it again, so recently I installed it's latest version (Linux Mint 5-r1 Elyssa) on my old laptop.

It is nice but a little bit heavy for the limited resources on my laptop.
Searching in google, I found a guide to improve the gnome performance here.

Basically it simply suggest to make gnome "plain" by turning off the menu icons, splash screen, panel animation etc, plus "using a theme which require less cpu resources".

So I did as suggested and when I was playing with Linux Mint's themes, I stumbled upon one of the included themes, named "Lightning".
When I tried this theme, suddenly everything feels lite and fast.
And I think this theme is also beautiful:


Well, thank's to Linux Mint, now I have a nice, lite and fast distro which is perfect for my old laptop.

24 August 2008

xorg.conf - Ubuntu 8.04 for Toshiba Tecra 8200 Laptop

For my personal note, I put here the content of xorg.conf file of Ubuntu 8.04 Hardy Heron for my old laptop.

I have to use this xorg.conf because the default one failed to give correct video resolution of the laptop.

This is also applicable on Linux Mint 5.0 Elyssa (I have tested it), and most probably on other distros based on Ubuntu Hardy Heron.

I created the xorg.conf by following a nice tips I found on Ubuntuforums.
Big thank's to ilovelinux33467 who wrote the tips ..... (and yes, he is only 14 years old !!! )


##
##
## SOURCE: http://ubuntuforums.org/showthread.php?p=4772671
## BIG THANK'S TO: ilovelinux33467
##
##
# xorg.conf (X.Org X Window System server configuration file)
#
# This file was generated by dexconf, the Debian X Configuration tool, using
# values from the debconf database.
#
# Edit this file with caution, and see the xorg.conf manual page.
# (Type "man xorg.conf" at the shell prompt.)
#
# This file is automatically updated on xserver-xorg package upgrades *only*
# if it has not been modified since the last upgrade of the xserver-xorg
# package.
#
# If you have edited this file but would like it to be automatically updated
# again, run the following command:
# sudo dpkg-reconfigure -phigh xserver-xorg

Section "InputDevice"
Identifier "Generic Keyboard"
Driver "kbd"
Option "XkbRules" "xorg"
Option "XkbModel" "pc105"
Option "XkbLayout" "us"
EndSection

Section "InputDevice"
Identifier "Configured Mouse"
Driver "mouse"
Option "CorePointer"
Option "Emulate3Buttons" "true"
EndSection

Section "InputDevice"
Identifier "Synaptics Touchpad"
Driver "synaptics"
Option "SendCoreEvents" "true"
Option "Device" "/dev/psaux"
Option "Protocol" "auto-dev"
Option "HorizEdgeScroll" "0"
EndSection

Section "Device"
Identifier "Configured Video Device"
Boardname "Trident CyberBlade (generic)"
Busid "PCI:1:0:0"
Driver "trident"
Screen 0
Vendorname "Trident"
EndSection

Section "Monitor"
Identifier "Configured Monitor"
Vendorname "Generic LCD Display"
Modelname "LCD Panel 1024x768"
Horizsync 31.5-48.0
Vertrefresh 56.0 - 65.0
modeline "640x480@60" 25.2 640 656 752 800 480 490 492 525 -vsync -hsync
modeline "800x600@56" 36.0 800 824 896 1024 600 601 603 625 +hsync +vsync
modeline "800x600@60" 40.0 800 840 968 1056 600 601 605 628 +hsync +vsync
modeline "1024x768@60" 65.0 1024 1048 1184 1344 768 771 777 806 -vsync -hsync
Gamma 1.0
EndSection

Section "Screen"
Identifier "Default Screen"
Monitor "Configured Monitor"
Device "Configured Video Device"
Defaultdepth 24
SubSection "Display"
Depth 24
Virtual 1024 768
Modes "1024x768@60" "800x600@60" "800x600@56" "640x480@60"
EndSubSection
EndSection

Section "ServerLayout"
Identifier "Default Layout"
screen 0 "Default Screen" 0 0
Inputdevice "Synaptics Touchpad"
EndSection
Section "Module"
Load "glx"
Load "GLcore"
Load "v4l"
EndSection
Section "device" #
Identifier "device1"
Boardname "Trident CyberBlade (generic)"
Busid "PCI:1:0:0"
Driver "trident"
Screen 1
Vendorname "Trident"
EndSection
Section "screen" #
Identifier "screen1"
Device "device1"
Defaultdepth 24
Monitor "monitor1"
SubSection "Display"
Depth 24
Modes "640x480@60"
EndSubSection
EndSection
Section "monitor" #
Identifier "monitor1"
Vendorname "Plug 'n' Play"
Modelname "Plug 'n' Play"
modeline "640x480@60" 25.2 640 656 752 800 480 490 492 525 -vsync -hsync
Gamma 1.0
EndSection
Section "ServerFlags"
EndSection

23 June 2008

Puppy Linux 4.0 on my old laptop: it's getting better

Recently I tried one of my fav distro, Puppy Linux, on my very old laptop Toshiba Tecra 8200.
And this time I found a pleasant surprise.

Previous versions of Puppy Linux always failed to boot on this laptop as they were unable to recognize the video chipset of the laptop, which is Trident Cyberblade XP.

Usually as a workaround I followed the steps as suggested in this thread and this thread in Puppy's Forum, which was basically I had to copy a working xorg.conf from other distro and then pasted it to Puppy when the booting halted.

In the newest version of Puppy Linux, the 4.0 version, I don't have to do that workaround again.
Now during booting session, the following message came out:


I just followed the instruction, then the wizard came out guiding me to choose the video/display hardware configuration:


And it works !

(Posted from Puppy Linux 4.0)

31 May 2008

The easiest way to create Ubuntu 8.04 LiveUSB

I just found the easiest way to create Ubuntu 8.04 live usb flash disk, thanks to this nice tool:

http://klik.atekon.de/liveusb/


The steps:

- Run the Ubuntu 8.04 Desktop live cd.

- Download the tool from here.

- Right click the downloaded file and click "Open with Gdebi Package Installer" (it will automatically download and install two additional packages, i.e. mtools and syslinux)

- Insert the USB flash disk.

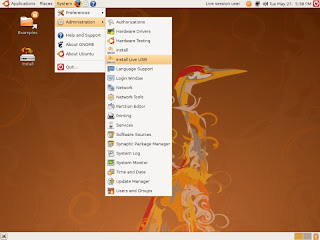
- Go to System > Administration > Install Live USB


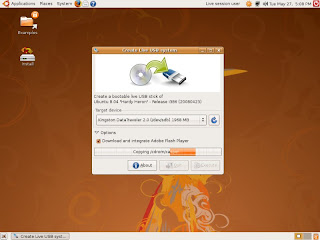
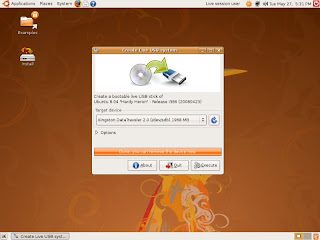
- A window titled "Create Live USB System" will pop-up, select the Target Drive, click Execute.
(bonus: there is an option to download and install Adobe Flash).


- Wait the files copied from cd to the flash disk.

- Done

23 May 2008

Mencoba OpenBravo ERP di Mepis 7.0

Selain PostBooks, OpenBravo adalah salah satu aplikasi ERP opensource yang sangat populer. OpenBravo dirancang sebagai aplikasi berbasis web, sehingga setelah diinstal di server, untuk mengaksesnya cukup dengan menggunakan browser, yang bisa dijalankan dari Linux, Windows ataupun Mac.

Ada banyak referensi dan tutorial mengenai cara menginstal OpenBravo di linux, dan salah satu yang menurut saya sangat bagus buat pemula adalah ini:

http://www.moixo.com/en/setup-openbravo-ubuntu-feisty-fawn

Untuk menginstal OpenBravo, tahapan yang diperlukan adalah sbb:

1. Instal dan setup Java SDK
2. Instal dan setup Tomcat dan Ant
3. Instal dan setup PostgreSQL
4. Instal dan setup OpenBravo

Khusus untuk point ke 3 yaitu setup PostgreSQL, saya mengikuti tutorial yang juga cukup bagus dari:

http://www.murti.web.ugm.ac.id/2007/11/24/how-to-install-openbravo-on-gutsy/

Akhirnya di salah satu partisi yang berisi Mepis 7.0, saya coba install OpenBravo versi gratisnya yang terbaru (2.35-MP1).

Dari coba2 sesaat OpenBravo, memang terasa aplikasi ERP ini sangat bagus dan lengkap. Tidak heran jika OpenBravo saat ini menduduki ranking atas di sourceforge.net untuk kelompok aplikasi enterprise maupun finansial.

Beberapa link OpenBravo:

http://www.openbravo.com

http://sourceforge.net/projects/openbravo

http://wiki.openbravo.com/wiki/Openbravo_ERP_installation#Bitrock_installer

http://wiki.openbravo.com/wiki/Getting_started_with_Openbravo

http://wiki.openbravo.com/wiki/index.php/User_Manual

http://wiki.openbravo.com/wiki/index.php/User_Manual_2.3/Financial_Management


Beberapa screenshot:


Sekian dulu.

.

17 May 2008

Mencoba xTuple PostBooks ERP di Ubuntu Hardy

PostBooks adalah versi gratis aplikasi sistem ERP (Enterprise Resource Planning) berbasis open source buatan xTuple.

Untuk menjalankan databasenya, PostBooks menggunakan Postgresql.

Setelah baca2 berbagai referensi, akhirnya berhasil juga menginstal PostBooks di Ubuntu Hardy.

Berikut referensi yang saya ikuti:

Howto Forge
http://howtoforge.com/postbooks_on_ubuntu704

Video Instalasi PostBooks di Ubuntu 7.04
http://www.xtuple.com/pbvideos/installu.html

Tambahan konfigurasi:
http://www.xtuple.org/phpBB2/viewtopic.php?t=2266

Websites:
http://www.xtuple.com/
http://www.openmfg.com/index.php
http://www.xtuple.org/
http://www.xtuple.org/phpBB2/
http://sourceforge.net/projects/postbooks/

User Guide:
http://www.xtuple.com/docs/userguide/
http://www.openmfg.com/download/demo.pdf


Dan berikut beberapa screenshots-nya:


01 May 2008

3Com OfficeConnect ADSL Wireless Router unable to connect over PPPoE [SOLVED]

For my internet connection at home I am using 3Com OfficeConnect ADSL Wireless Router (model 3CRWDR101A-75)

Some days ago, suddenly the router failed to make connection.

It turns out that the problem was caused by two things i.e.: the connection setting had changed from PPPoA to PPPoE and the router needed updated firmware to be able to connect over PPPoE.

Solving this problem is easy:

- download the latest firmware (the firmware name is 3CRWDR101A-75_v1.10.00.A.exe) from here

- extract it (since it's an exe file, I use 7zip on windows) and get this file: 3CRWDR100A-72_FW_V206T13.bin

- open the router web interface, go to the System Tools > Upgrade section and install the firmware from there

Problem solved.


Behind the scene:

Solving the above problem was easy, but how to find the solutions was not that easy for me.
I found out that there were two main things causing the problems i.e.: the connection from ISP had been changed to PPPoE and the router needed updated firmware to be able to connect using PPPoE.
But before came to that findings, I had to go through long and tedious trial and error steps:

- First try was resetting and reconfiguring the router to it's default setting provided by the ISP, but this had no effect.
All indicator lamps of the router were on, except the on-line indicator.

- My next try was checking whether there was a problem with the ADSL line so I unplugged the router and replaced it with the modem I got from the ISP (it is Speedtouch USB 330 ADSL Modem and it is not natively supported in linux). Booted to windows and tried to make connection, but still there was no connection.

- I concluded that there was a problem with the ADSL line so I called the ISP.
Their suggestion was reinstalling the driver of the modem.
Although I thought they did not understand the problem, I did their suggestion, reinstalled the modem driver and strangely connection worked using the modem. So the ADSL line was O.K.

- I replaced the modem with the router to make connection but still it was unable to make connection.

- Checked the log in the router, saw error message: "PPP fail: Timeout in LCP negotiation"

- Re-plugged the modem, made connection and checked the connection properties on the modem.
I noted that the connection now used PPPoE protocol (with encapsulate: LLC). I knew that initially it was PPPoA and WCMUX. I didn't have any idea why it changed.

- To make sure, I booted to Ubuntu 7.10 live CD, installed (on live mode) the USB ADSL Modem Manager and set the connection.
When I set it to PPPoE I got connection and when I set it to PPPoA the modem failed to connect. So it was confirmed the connection now use PPPoE protocol.

- However when I plugged the router again and reconfigured it's settings to PPPoE accordingly, it was still unable to get connection.

- Checked the log in the router and saw error message: "PPPoE send PADI"

- At this step I started to googling and googling, using the error messages on the log as the keyword.
I also tried many combination of keywords like: "router unable to connect pppoe" "3Com unable to connect with PPPoE" e.t.c.
After reading a lot of posting from google, I found several useful posting leading to the solution of my problem.

- This posting introduced me about something I did not realize: maybe I should upgrade the firmware of the router.

- Then this posting confirmed that a firmware upgrade was required.
The posting is in Spanish (?) but luckily the author quoted in English that there was a bug in the router firmware causing it to prevent to connect using PPPoE, and he also showed this link on 3Com website to download the firmware.

- I searched again to find out how to upgrade the firmware and found this posting.

- At this stage I realized that I should go to the manufacturers (3Com) website at the first place before searching from other sources.


Moral of the story:

- When there is a problem with the hardware, I should find out the error message from the log.

- Before googling, I should go to the manufacturer's website first and check the firmware update available for the related hardware and read the release notes.
22 April 2008

Mandriva One 2008.1 and old laptop: it works \o/

Yes ! Eventually Mandriva One 2008.1 works in my old laptop !
(And it means I have to apologize to Mandriva for my previous post).

This is what happened:
- out of curiousity, I created the CD again, this time I burned it at the slowest speed
- run the CD and, same as previous, after three second of initial boot splash, the booting instantly stopped, the screen become blank and the laptop remain silent
- previously at this stage I would reset the laptop, but this time unintentionally I left the laptop on, I forgot to reset it
- then after about 3 minutes, suddenly the screen showed the initial boot splash again the cd started to spin, the booting process continued !
- about 7 minutes later, the desktop came alive perfectly :)


I knew it. I knew that somehow Mandriva would work, I just did not know how.

And I found some very interesting stuff:

1. When I inserted my USB flash, one application called "Drak Snapshot" came out. It is a back-up application and it is very nice and user-friendly.


2. My USB wifi adapter recognized out of the box and I think the wifi setup in Mandriva is the easiest ever.


3. The Control Centre is superb, it even has Parental Controls !


Also I have to mention that some Mandriva users have been kindly tried to help me.
In my previous post, meta and fabrice immediately dropped their comments offering some suggestions.

When I posted my problem on their forum, immediately it also got attention and very nice responses from Reebus (a very active and helpful user) and the famous moderator himself: Adam Williamson.
Thank you guys !

Well. now this is the hard part: shall I install Mandriva to replace Mepis....

16 April 2008

Mandriva One 2008.1 and old laptop: alas ....

Several months ago, I had a chance to try running the live cd version of Mandriva One (version 2008) on my old laptop.
At that time I was very impressed, it was beautiful, very user-friendly and everything just worked flawlessly. I really like it so much that I decided to install it permanently replacing Ubuntu Gutsy.
Later on I postponed the plan in view that the new version (2008.1 Spring) was under development, I thought I better wait for it.
So when Mandriva One 2008.1 Spring was out several days ago, I was very excited.
Although I prefer the Gnome version, I also downloaded the KDE version to try this beautiful distro.

Alas, my excitement did not last long.

Both CD did not manage to boot, all I got was initial boot splash and then the booting instantly stopped, leaving the screen in black.
(Strangely both CD works fine on my desktop).

I have tried many distro on this laptop and that was the first time it failed to boot, so I was very curious.
I tried to boot using boot parameters combination (adjusting the screen resolution, set the acpi off, remove splash, etc) without any success.
For several days I tried and tried, searching any information on the net, hoping to find any clue, but so far I could not find any.

Well, for now I have to give up and forget installing this beautiful distro on my old laptop.
I guess this time I am not lucky :(

10 April 2008

xorg.conf - Ubuntu Gutsy for Toshiba Tecra 8200 Laptop

Content of xorg.conf file of Ubuntu Gutsy for my laptop:


# xorg.conf (xorg X Window System server configuration file)
#
# This file was generated by dexconf, the Debian X Configuration tool, using
# values from the debconf database.
#
# Edit this file with caution, and see the xorg.conf manual page.
# (Type "man xorg.conf" at the shell prompt.)
#
# This file is automatically updated on xserver-xorg package upgrades *only*
# if it has not been modified since the last upgrade of the xserver-xorg
# package.
#
# If you have edited this file but would like it to be automatically updated
# again, run the following command:
# sudo dpkg-reconfigure -phigh xserver-xorg

Section "Files"
EndSection

Section "InputDevice"
Identifier "Generic Keyboard"
Driver "kbd"
Option "CoreKeyboard"
Option "XkbRules" "xorg"
Option "XkbModel" "pc105"
Option "XkbLayout" "us"
EndSection

Section "InputDevice"
Identifier "Configured Mouse"
Driver "mouse"
Option "CorePointer"
Option "Device" "/dev/input/mice"
Option "Protocol" "ImPS/2"
Option "ZAxisMapping" "4 5"
Option "Emulate3Buttons" "true"
EndSection

Section "InputDevice"
Identifier "Synaptics Touchpad"
Driver "synaptics"
Option "SendCoreEvents" "true"
Option "Device" "/dev/psaux"
Option "Protocol" "auto-dev"
Option "HorizEdgeScroll" "0"
EndSection

Section "InputDevice"
Driver "wacom"
Identifier "stylus"
Option "Device" "/dev/input/wacom"
Option "Type" "stylus"
Option "ForceDevice" "ISDV4" # Tablet PC ONLY
EndSection

Section "InputDevice"
Driver "wacom"
Identifier "eraser"
Option "Device" "/dev/input/wacom"
Option "Type" "eraser"
Option "ForceDevice" "ISDV4" # Tablet PC ONLY
EndSection

Section "InputDevice"
Driver "wacom"
Identifier "cursor"
Option "Device" "/dev/input/wacom"
Option "Type" "cursor"
Option "ForceDevice" "ISDV4" # Tablet PC ONLY
EndSection

Section "Device"
Identifier "Trident Microsystems CyberBlade/XP"
Driver "trident"
BusID "PCI:1:0:0"
EndSection

Section "Monitor"
Identifier "Generic Monitor"
Option "DPMS"
HorizSync 28-51
VertRefresh 43-60
EndSection

Section "Screen"
Identifier "Default Screen"
Device "Trident Microsystems CyberBlade/XP"
Monitor "Generic Monitor"
DefaultDepth 24
SubSection "Display"
Modes "1024x768"
EndSubSection
EndSection

Section "ServerLayout"
Identifier "Default Layout"
Screen "Default Screen"
InputDevice "Generic Keyboard"
InputDevice "Configured Mouse"

# Uncomment if you have a wacom tablet
# InputDevice "stylus" "SendCoreEvents"
# InputDevice "cursor" "SendCoreEvents"
# InputDevice "eraser" "SendCoreEvents"
InputDevice "Synaptics Touchpad"
EndSection

08 April 2008

Old laptop and Mepis 7.0: very nice indeed :)


This is my note for Mepis 7.0 installed on my old-linux-friendly laptop :)
(it's Toshiba Tecra 8200 PIII, more here).

KDE fonts
By default Mepis already rendered the fonts correctly on the laptop's LCD screen, but I did some mess.
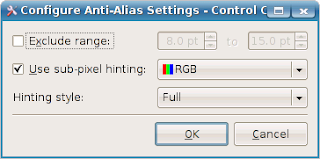
To restore the correct displayed fonts, open from menu: Control Centre > Appearance & Theme > Fonts go to "Use anti-aliasing" and select "Enabled" then click "Configure" check "Use sub-pixel hinting: RGB" and select "Hinting style: Full"


Firefox fonts
At first I was a little confused because Firefox rendered horrible fonts of the websites.
After several trial and error, it turns out that the trick was very simple.
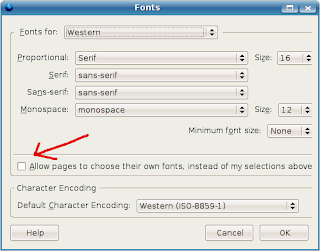
This is what I did: in Firefox menu go to Edit > Preferences > Content and go to Fonts & Colors section and click Advanced.
Then un-check this box "Allow pages to choose their own fonts, instead of my selections above"


Wireless
My usb wireless adapter (it is 3Com OfficeConnect Wireless model no: 3CRUSB10075) works out of the box with Mepis.
But first I had to activate the Network Manager (it was not activated during system boot).
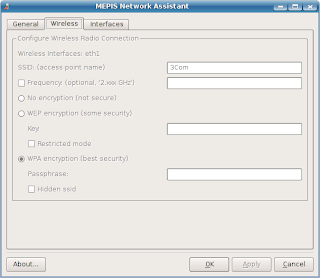
This is what I did: from the main menu, open System > Mepis > MEPIS Network Assistant.
In the General Tab go to "Interface Configuration Mode" section and check "Automatic (networkmanager)". I left other sections as it is.


In the Wireless Tab: because I am using WPA encryption in my wifi set-up at home, I fill in the SSID name and WPA-key.


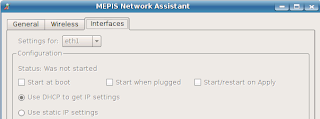
In the Interfaces Tab: choose "Start at boot" and "DHCP".


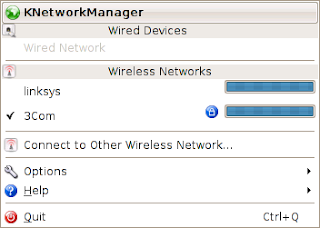
To connect to other available Wireless Network, just right-click the KNetworkManager applet and click the desired network from the list.


(Later on I found this detailed and excellent guide by Zerias).

Suspend to RAM
At first suspend to RAM did not work, then I found the work around from Mepislovers.org forums, which is very simple:

open /etc/powersave/sleep
find this line:
SUSPEND2RAM_FORCE=""

insert the word "yes" between the quote marks, so it looks like this:
SUSPEND2RAM_FORCE="yes"

Save it and reboot (in my experience, it seems reboot is compulsory in this step, otherwise suspend to RAM will not work).

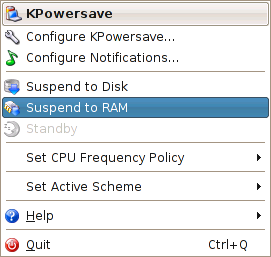
To suspend just right-click the KPowersave applet and click Suspen to RAM


Suspend to Disk
Works out of the box.

OpenOffice Impress
By default OpenOffice Impress is left out in Mepis and since sometimes I need to open presentation files, I just installed it from Synaptic.

Over all
This laptop works great with Mepis 7.0, it feels light and stable.
I have no problem with sound and video.
I feel it is faster than Ubuntu, yet with 256MB RAM, running Firefox and OpenOffice together is still not that fast :)
Over all, with Mepis on it, I must say the laptop is very nice indeed.

27 March 2008

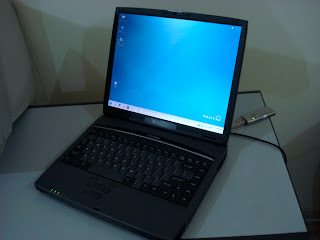
The Laptop


I bought this refurbished old laptop very cheap 2 years ago from one premium online shop, with the help of my friend.
I received it in very good, clean, polished and complete condition (along with its original accesories, user manual and recovery cd).
The laptop is very nice built and robust. It must be a top line during its lifetime :)
The installed operating sistem is Original Microsoft® Windows® 98 SE.
I resized the Windows partition to 5 GB, and alocated the rest 15 GB for swap and linux.
All in all I am happy with this laptop, I have tried many distros on it and I can say that this is a nice and linux-friendly laptop.

Specifications:
- Model: Toshiba Tecra 8200

- Intel® Pentium 3-M 850Mhz

- Memory 256 SDRAM

- Hard disk: 20GB

- Display: 14.1 inch (1024x768)

- Video Card: Integrated Graphics Trident XP4

- Internal Optical Drive: DVD ROM

- Sound: Yamaha YMF 754

- Network: Integrated 10/100 Network Card and Modem (AC 97)

- Wireless connection:

The laptop does not come with internal wireless card, so I bought this USB wireless adapter:
3Com OfficeConnect Wireless 54Mbps 11g Compact USB Adapter (model no: 3CRUSB10075) using Zydas / zd1211 driver.

I guess I am lucky because this USB wireless adapter just works on most distros I tried (including the WPA encryption).

19 March 2008

Catatan selama istirahat ngeblog

Catatan beberapa kegiatan 'penting' selama istirahat ngeblog (yang masih ingat):

- Sukses upgrade ke Ubuntu Gutsy di pc bekas (celeron + RAM 512MB) dan laptop jadul (Toshiba Tecra P III+RAM 256MB)

- Praktek membuat remaster Ubuntu menggunakan Reconstructor dan berhasil membuat Ubuntu+multimedia codecs :)

- Mengunduh dan mencoba macam2 distro yang bagus-bagus:
Freespire, DreamLinux, PUD Linux (Ubuntu mini), Mandriva One Gnome, Linux Mint (versi gnome, xfce, fluxbox), Antix, gOS, BlankOn, Debian Depok (install di virtual box), PCLinuxOS (MiniMe 2008, TinyMe, Muslim Edition), Gobolinux, Sabayon, Kiwi Linux (Ubuntu+multimedia), CrunchBang (Ubuntu+openbox), dan banyak lagi yang lainnya (lupa...)

- Gara2 ketemu CruchBang Linux akhirnya coba-coba install openbox di Ubuntu berikut beberapa aplikasi pendukungnya (pypanel, obmenu, wbar, thunar dsb).
Ubuntu + openbox cukup menyenangkan, minimalis, ringan dan cepat (tapi firefox tetap terasa lambat)

- Ubuntu Gutsy lama-lama terasa lambat baik di pc maupun di laptop

- Akhirnya hard disk di pc celeron mati, maka untuk sementara pc celeron di non-aktif-kan, RAM 512 dipindah ke pc pentium (P4 , RAM jadi 768MB).
Mepis 6.5 yg ada di pc ini terasa sangat cepat dan responsif (karena Mepis nya atau P4 nya atau RAM 768MB nya ?)

- Ubuntu Gutsy di laptop sementara dihapus. Sebetulnya ingin praktek netinstall Debian, tapi kelihatannya wireless usb adapter belum kompatibel.
Akhirnya install Mepis 7.0 yg sekarang kembali berbasis Debian.
Mepis 7.0 di laptop tua terasa cukup ringan dan cepat.
Ada beberapa catatan mengenai pengaturan wireless, fonts, dan suspend / hybernate.

Mudah-mudahan nanti sempat bikin catatan yang lebih detail dari beberapa kegiatan di atas.

Sementara santai dulu sambil nunggu rilis Ubuntu 8.04 dan Mandriva 2008.01 :)